If you own a website, it’s crucial to understand how it’s performing and how your visitors are interacting with it. This is where Google Analytics comes in handy. It is a powerful and free tool that helps website owners gather important data about their website traffic, user behavior, and other metrics. In this blog post, we will guide you on how to add Google Analytics to your WordPress website in a snap!
What can you use Google Analytics for?
Google Analytics is a free web analytics service provided by Google that allows website owners and marketers to track and analyze website traffic and user behavior. It provides insights into how users interact with a website, including information such as the number of visitors, where they are coming from, what pages they are visiting, how long they are staying on the website, and much more. By tracking this information, website owners can better understand their audience and make data-driven decisions to improve their website’s performance, user experience, and ultimately achieve their business goals.
Here are the steps to adding this magic tools to your website:
Step 1: Create a Google Analytics Account
Before you can add Google Analytics to your WordPress website, you need to create a Google Analytics account. If you don’t already have one, go to the Google Analytics website and click on the “Start for free” button. Then, follow the prompts to create your account. Once you’ve completed the setup process, you’ll be provided with a unique tracking code that you’ll need to add to your WordPress website.

Step 2: Install a Google Analytics Plugin
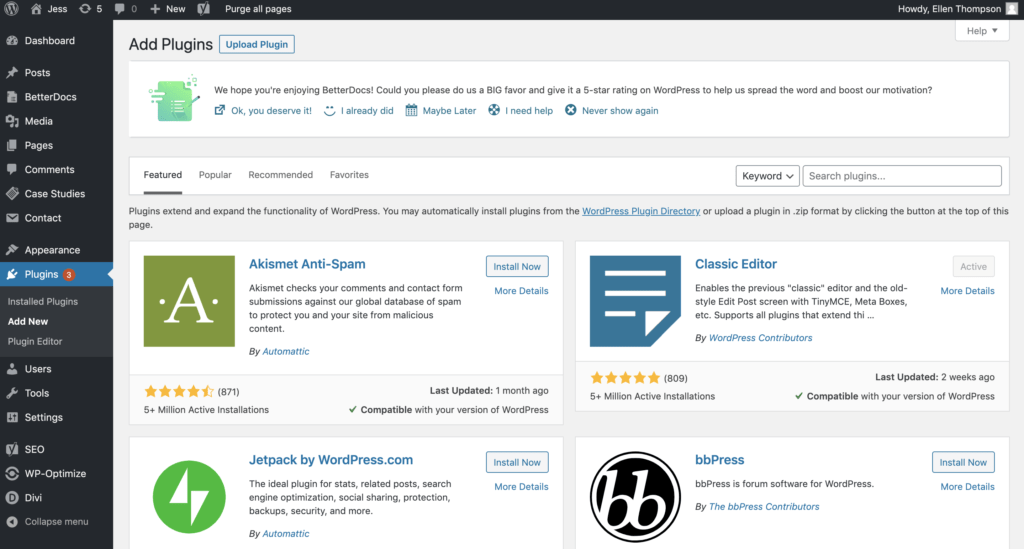
To easily add the Google Analytics tracking code to your WordPress website, you need to install a plugin. One of the most popular options is the “MonsterInsights” plugin. To install the plugin, go to your WordPress dashboard, click on “Plugins”, then “Add New”, and search for “MonsterInsights”. Once you’ve found the plugin, click on “Install Now” and then “Activate”.

Step 3: Connect your Google Analytics Account to the Plugin
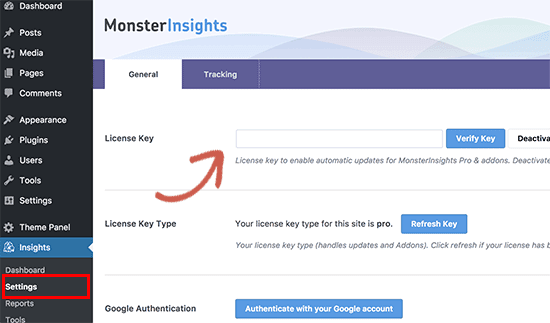
After installing the MonsterInsights plugin, you’ll need to connect it to your Google Analytics account. To do this, go to your WordPress dashboard and click on “Insights” > “Settings”. From there, click on the “Authenticate with your Google account” button and follow the prompts to connect your account.

Step 4: Configure the Plugin Settings
Once you’ve connected your Google Analytics account to the plugin, you can configure the plugin settings to track the data you want. This includes setting up goals and tracking events. To access the plugin settings, go to your WordPress dashboard and click on “Insights” > “Settings”.
Make your marketing efforts count
Congratulations! You’ve successfully added Google Analytics to your WordPress website. From now on, you can monitor your website’s traffic, user behavior, and other important metrics using Google Analytics. By tracking this information, you’ll be able to make data-driven decisions to improve your website’s performance and user experience.
At Advesa, we understand the importance of having accurate and reliable data when it comes to digital marketing. That’s why we offer Google Analytics integration services as a part of our comprehensive suite of digital marketing solutions. Our team of experts can seamlessly integrate Google Analytics into your WordPress website, providing you with the insights you need to optimize your online presence and achieve your business goals. From setting up goals and tracking events to providing in-depth analysis and reporting, we have you covered.
Contact us today to learn more about our Google Analytics services and how we can help your business thrive in the digital landscape.


